Who doesn’t love a good fashion statement? From bold colors to statement pieces, fashion can be a form of self-expression. But what about creating your own pieces? Sewing is not only a practical skill, but also an opportunity to be creative and make something truly unique.
The Hooded Jacket
 One great sewing project to try is the hooded jacket. This jacket can be customized to fit your personal style and can be made using a variety of different fabrics.
The first step is to choose your fabric. Choose a fabric that is appropriate for the climate in which you live, as well as for the purpose of the jacket. If you plan to wear the jacket in the rain, choose a fabric that is waterproof.
Next, gather your supplies. You will need the fabric you chose, a sewing machine, thread, scissors, pins, and a zipper. You may also want to include a drawstring for the hood.
Now it’s time to get started. Cut out the pieces for your jacket using a pattern or by creating your own. Begin by sewing the pieces together to form the body of the jacket. Next, attach the zipper to the front of the jacket.
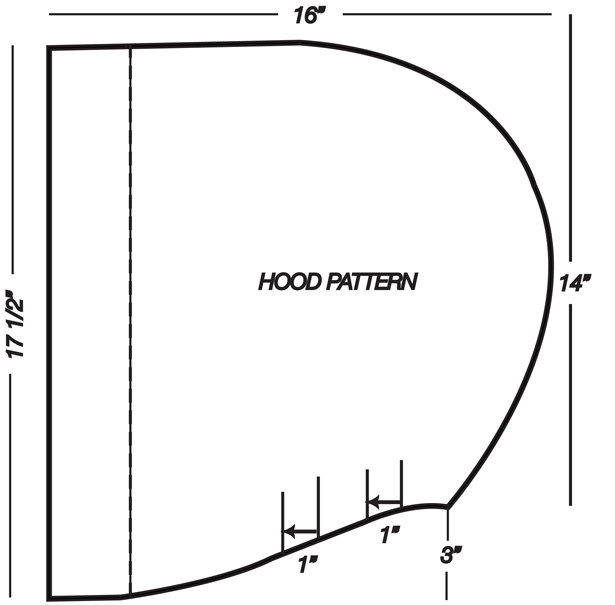
Once the body of the jacket is complete, it’s time to add the hood. Cut out the pieces for the hood and sew them together. Attach the hood to the body of the jacket and add the drawstring if you choose.
Finally, add any finishing touches, such as pockets or a lining, and you’re done! Your new hooded jacket is ready to wear.
The Wrap Skirt
 If you’re looking for a more feminine, flowy piece, consider making a wrap skirt. This skirt is easy to wear and can be made using a variety of fabrics. Plus, it’s perfect for warm weather.
The first step is to choose your fabric. Lightweight cotton is a good option for a comfortable, casual skirt. If you want a more formal look, consider using silk or satin.
Gather your supplies, including the fabric, thread, scissors, pins, and a zipper or buttons for closure. You will also need your waist measurement and the length you want the skirt to be.
Next, cut out the fabric for your skirt. You will need one large rectangle in the length you desire, as well as two long strips for the waistband and ties.
Sew the two long strips together to create the waistband. Attach the waistband to the top of the rectangular piece of fabric, leaving room for closure in the back. Attach the zipper or buttons to the closure.
Now it’s time to create the wrap. Cut a slit in the front of the skirt, leaving enough fabric to create an overlap. Sew the overlap down, creating a pocket for the tie to go through. Hem the bottom of the skirt, and you’re done!
The Statement Dress
 If you’re feeling bold, why not try making a statement dress? This type of dress is perfect for special occasions and can be customized to fit your personal style.
Begin by choosing your fabric. A bold print or bright color will make your dress stand out. You will also need to choose a pattern that suits your style and your sewing skill level.
Gather your supplies, including the fabric, thread, scissors, pins, and any embellishments you want to add.
Begin by cutting out the pieces for your dress. Follow the pattern instructions carefully to ensure the pieces fit together properly. If you’re feeling adventurous, you can even modify the pattern to create your own unique design.
Begin sewing the pieces together, starting with the bodice. Create any darts or pleats necessary to create the proper shape. Once the bodice is complete, move on to the skirt.
If you want to add embellishments, such as lace or sequins, now is the time to do so. Sew the embellishments onto the dress before attaching the skirt.
Once the skirt is attached to the bodice, hem the bottom of the dress and add a zipper or buttons for closure. Your new statement dress is now ready to wear!
Sewing is a fun, practical skill that allows you to create unique pieces that express your personal style. Whether you’re making a hooded jacket, a wrap skirt, or a statement dress, the possibilities are endless. So grab your fabric, thread, and sewing machine, and get started on your next sewing project!